

This we created for Naomi, my visual learner. When Honi, my more tactile learner, saw it she instantly wanted to make one of her own. If you fancy making your own here is how we made ours...
You will need:
- Cardboard (we used an old cereal box)
- A small bowl and a larger bowl (or a compass if you prefer)
- Pencils and pens
- A full circle protractor
- A ruler
- A split pin
- modelling clay or something similar
First draw around your two bowls on to your cardboard like this...

Then carefully cut it out...

You will have two discs like this...

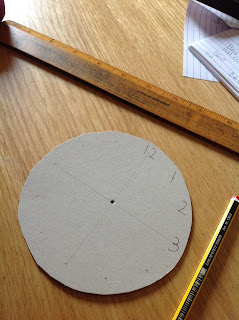
In a full circle there are 360⁰and there are 12 numbers on a clock, so we need to do a little division: 360 divided into 12 which is... 30. So we need to mark in 30⁰ increments all the way round our small cardboard disc.

So it looks something like this...

Then, using your dots from the 0⁰ point to the 180⁰ point and the 90⁰ and the 270⁰ points draw two lines with a ruler and pencil like this to find the centre point.

When you have your centre point use a sharp pencil with some modelling clay underneath and push a hole in the centre of your disc...

Then, using the 12 dots you made, write the numbers on your clock face like this...
With the large disc, only measure out the four dots from the 0⁰ point to the 180⁰ point and the 90⁰ and the 270⁰ points. Again, draw two lines with a ruler and pencil to find the centre point, making another hole in the centre point of the large disc this time.
Then you should have something like this...
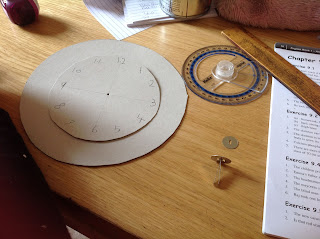
With the large disc you will only see the outside of the circle, on this bit we wrote out the 5 minute increments - above the 12 we wrote 0, on the outside of 1 we wrote 5 and so on... So when we finished in the end it looked like this...

Next draw out two hands for your clock. One should be 6cm long and the other should be 4cm long. They should both be at least 15mm thick. Make sure it's thick enough to put a hole in them using your pencil so it makes a hole as oppose to a tear. Then make the hole the same way as you did with the discs.


All you need to do then is colour all the pieces in!

Carefully put your split pin through the hands of your clock, the small disc (the clock face) and then the large disc last. Then you will be ready to use it for your maths or just have a play! It's great because not only the hands are free to move but so is the 5 minute increments. This makes it easier for children to solve maths problems like, when was 20 minutes ago or what time will it be in 45 minutes...

Things we can learn from this:
There is loads of maths going on in this...
- We are making shapes
- Measuring angles and length
- Dividing
- Talking about fractions - halves and quarters, even twelfths.
- Clock faces and clock hands
- Counting in 5s
- Practise with writing numbers
Colouring practice is always good for strengthening hand muscles ready helping us to write more easily.
It's a fun craft and it also counts as a Design and Technology project too.
very good :)
ReplyDeleteThank you. Naomi used it again today :)
Delete