
Did you know that different chemicals give out different coloured flames? I have already written a bit about this in my posts: heating magnesium, Experiment with heating Iron and Experimenting with copper.

This time it is less to do with heating metals and more to do with heating chemicals, it's a fun project to do with a fireworks theme, lovely to see them glow in a fire but a Bunsen Burner, kitchen torch (we used one of these in our second attempt and it worked REALLY well) or Alcohol burner will work just as well or you could even put them on a disposable barbeque.
It does take 4-5 days to prepare and it can be expensive getting all the chemicals in but it is an exciting result.
What you will need:
- Pinecones - we picked up when we walk about the park
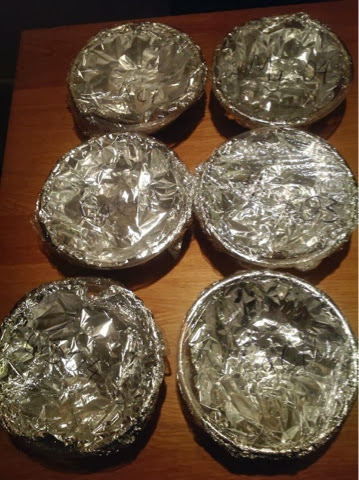
- 6 Bowls or Buckets
- water
- Foil
- Cling film
The chemicals we used were: - Magnesium Sulphate - Epsom salts
- Copper Sulphate
- Calcium Chloride
- Boric Acid - Borax
- Potassium Chloride - Lo-Salt
- Sodium Chloride - Table salt
NOW WHAT YOU NEED TO DO...
STEP ONE
Fill all 6 bowls with 500ml of water.
STEP TWO
We used 50g of each chemical. Put the Magnesium Sulphate into one bowl and label it.
Put the copper sulphate into the next, again label it.
Put the calcium chloride into the next, again label the bowl according to the chemical and so on until each bowl has a different chemical and is labelled accordingly.
Stir in the chemicals well until completely dissolved in the water.
STEP THREE
Divide your pine cones equally between the 6 bowls. We found 24 pine cones so had 4 per chemical. A good bit of maths thrown in too!
THE EXPERIMENT WILL WORK BEST IF THE PINE CONES ARE COMPLETELY DRY BEFORE SOAKING THEM IN OUR CHEMICAL SOLUTION.
STEP FOUR
You will notice that the pine cones will float. we held them under the water using the tin/aluminium foil like you can see in the photo below.
Now for patience. You must leave them to soak for 24 hours, we left ours for 48 hours just in case.
When you do go back and check on them you will notice that Osmosis has taken place. Osmosis is what has made the pinecones shrink.
STEP SIX
When your pinecones have soaked for long enough, carefully drain out the solution down your sink flushing it away with plenty of water.
Now leave your pinecones for at least 3 days. 72 hours! You will noticed that the chemicals have formed crystals on the pinecones, even more science!

Now, if they are completely dry, they are ready for burning.
BEFORE YOU DO THIS ENSURE THAT YOU ARE WEARING GOGGLES AND PREFERABLY PROTECTIVE CLOTHING!
The chemicals, when burned will give off gases which are not good to inhale, you must, however you chose to burn them, do so in a very well ventilated area.
We used an alcohol burner and tongs right next to the open back door to burn ours, it worked really well and we could see all the different coloured flames. You could cook them up in a disposable BBQ or a mini bonfire if you like. The different coloured flames are perfect for Guy Fawkes night!
If you are wondering what colours you are looking for...
- Sodium Chloride burns yellow
- potassium Chloride burns violet.
- Magnesium Sulphate burns white
- Boric Acid burns blue-green
- Copper Sulphate burns green
- Calcium Chloride Burns orange-red
You can try other chemicals, some of which are more difficult to get hold of are...
- Most Alcohol burns blue, like on the Christmas pudding. Ethanol is also an alcohol that will burn blue but you must be careful as this is highly flammable and you will only need a little to make this happen.
- Lithium chloride will burn pink/dark red
- Strontium chloride will burn a red colour
- Calcium will burn a brick red colour
- Sodium will burn a very intense yellow
- Zinc which, from what I have read and studied so far burns colourless.
There are more, these are only some that I have found.
Why do we see these different colours?
Each chemical element has electrons (Electrons are the negatively charged particles of atom) in different energy states around an atom.
When we heat a chemical, the energy is absorbed making the electron to move about quickly and causing it to become unstable.
When the chemical rises in the heat to the top of the flame it cools, this causes the electron to returns to its lower energy state and then the energy is released in the form of a colour, what in science is called a photon.
The energy of the photon determines the wavelength or colour. We have learnt more about this in another of An Ordinary Life's Science posts called: Splitting Light.

When is coloured fire used?
It is a common pyrotechnic effect used in stage productions, fireworks and by fire performers all over the world. The most common colours used are red, orange, blue, yellow and white.
Experimenting with different coloured flames is also a great way to demonstrate how chemicals change when subjected to heat and how they also change the matter around them.
pyro-technicians will generally use metal salts to color their flames, like we did with the Magnesium Sulphate, Calcium Chloride and Potassium chloride.
What we have done in this experiment is called a Flame Test. It is a procedure used in chemistry to analyse what a metal or chemical is made up by studying the colour of the flame.
For other experiments go to my Physics page, Chemistry page or Biology page.
No comments:
Post a Comment